There is no denying the fact that the world of marine electronics is a constantly evolving beast and recent Lowrance innovations have been mind-blowing. Whilst on one hand, these innovations can be extremely exciting for the technologically savvy angler who spends a large portion of their time on the water tinkering with their gadgets, the reality is that these same innovations can be potentially intimidating to those who aren’t as proficient with their use.
As a result, the occasional or even family angler may be slightly reluctant to delve too deep into the world of marine electronics due to the perceived complications with using these devices. This article aims to break down some of the barriers, providing a simplistic explanation on how to interpret the images you are actually seeing on your screen as well as recommendations on when to use some typical sounder functions to help you get the very best out of your unit.
Sonar Basics
Being able to identify the differences between hard and soft bottom surfaces/structure is a crucial step in firstly understanding how the marine ecosystem works as well as identifying an ideal fishing location. This important piece of information can tell you a lot about the fish species that may be present in the area as well as the availability of potential food sources. Soft bottoms are home to invertebrates and other burrowing organisms that are an essential part of the food chain – in short, this is where the food is! Unless you’re a flathead, most predatory fish will require hard structure for habitat and ambush points. What you should ideally be looking for is the place where both soft and hard substrates meet. These areas are transition zones that act as highways for these fish to move from their homes to their feeding grounds. Baitfish are also attracted to the periphery of hard structure.
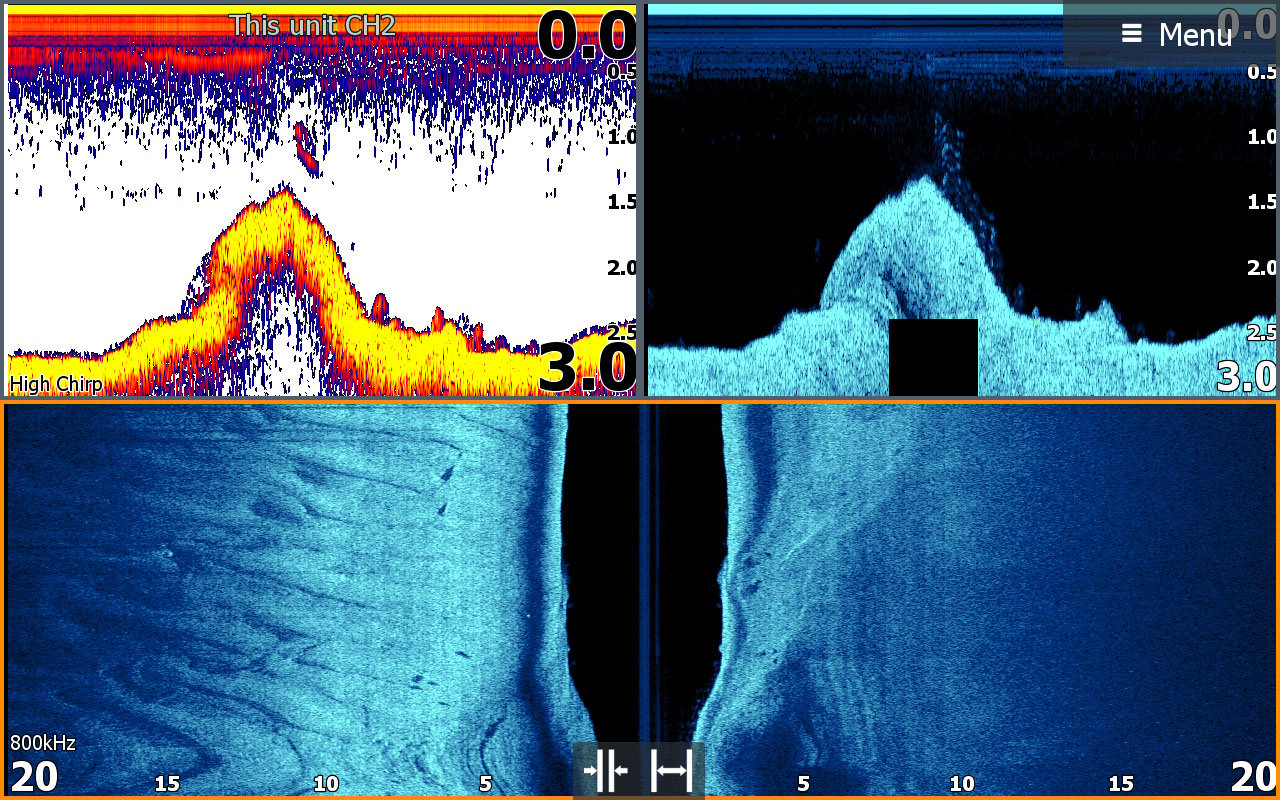
Hard structure such as this solid rock will always show as yellow on the traditional 2D sonar colour palette
Hard structure/bottoms produce a strong return on your screen due to the fact harder bottom reflects sound (echo) better, whereas softer structures/bottoms will turn out much weaker signals. The colour palette on your 2D sonar screen indicates the strength of the return and yellow indicates the strongest return, therefore being the hardest structure. If you suspect you are over hard bottom, rigid objects like logs, rocks and fish will appear. Whilst in the process of learning, you could always ground-truth a section you think may be hard structure by dropping down a line with a sinker to test your assumptions.
Another tip for truly being able to identify what you are seeing below the waterline is to run your general 2D sonar in tandem with your down scan on a split screen configuration. Your 2D sonar will pick up everything and I mean everything! Whilst this level of detail is a great tool, it can sometimes cause confusion, as it may not be 100% clear whether what you are seeing is bait, fish or structure. Identifying this structure firstly on your 2D sonar and then looking across to your traditional down scan will certainly flesh out this detail so that a more accurate understanding can be gauged. Just remember that you may not always see fish as perfect arches or physical profiles. A perfect arch or fishy looking profile only occurs when that fish sits at the perfect angle to the transducer beam and let me just say this is quite the rarity so don’t be too fixated on trying to see this. A slightly skewed arch, grain of rice looking shape or dense red blob on the screen will be fish as well. Whatever the shape may be, just be sure to look for the red colouration as the sounder picks up on the fish’s swim bladder and shows it as red in colour.
Discussing sounder frequency and when you should change from one frequency setting to another would require an article in itself but I will try and simplify it. 200kHz is a single frequency for traditional sonar. On newer Lowrance sounders, the 200kHz/high CHIRP (Compressed High-intensity Radar Pulse) exhibits a wider beam that is two times wider than older models, which means you should be finding double the fish. Down scan and side scan operate on 455kHz and 800kHz. A 455kHz cone angle has a greater coverage under water but will return an image with less definition. This is beneficial when scouting new country for the first time. An 800kHz cone angle will get a narrower coverage but with greater detail. This is handy when you already know the terrain you are fishing but are looking for those individual fish and other distinguishing features on the sounder.
Side Scan Sonar
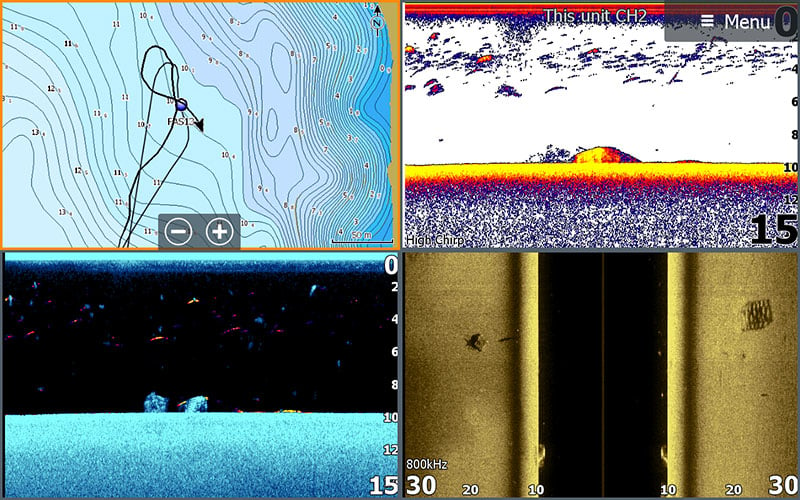
Side scan sonar has got to be one of the most exciting revelations and most important features of your sonar unit. Like the name suggests, side scan allows you to project a beam angle out either side of your boat which allows you to identify structure and fish up to a maximum of 200m either side of the boat. Imagine driving up the middle of a 400m wide river and seeing every fish and every bit of structure along that watercourse. This truly amazing feature allows you to scout out huge expanses of water and in a fraction of the time it would take with traditional 2D down scan sonar.
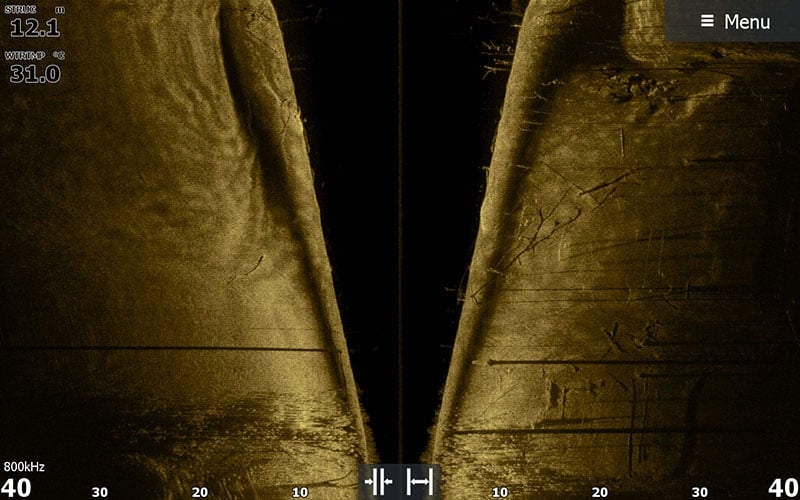
Running Side Scan on 800kHz gives you superior detail/clarity and is best used when viewing less than 40m (120 feet) in each direction. If you want to see further than 40m, revert to 455kHz.
Structure Scan HD uses a high frequency of either 455kHz or 800kHz which uses much larger cone angles, therefore allowing the unit to return images with greater detail. Any structure (rocks, trees, weed, snags, gullies etc) or fish present on the bed of the waterway will stand out like the proverbial when compared to the barren, smooth substrate they sit upon. When the side-projected beam hits the structure or even fish or bait, it projects a shadow, similarly to how an object in front of a torch light would. Fish may appear as shapes that look similar to grains of rice which may make you question as to whether the features are fish or not, however the shadows they cast certainly make them more identifiable as fish. When shooting your side scan beam past the leg of your motor you just need to remember to trim up your motor a fraction so the beam has a clear path to the other side of your boat.
An effective way to tackle a large expanse of water like a stocked impoundment or offshore reef for the first time is to run side scan on 455kHz and down scan in tandem. Setting your unit to 455kHz allows you to maximise your range capacity and see greater distances. Although you can choose to set the beam angle to read structure up to a maximum of 200m either side of the boat, a good compromise between range and detail is 80-100m either side of the boat. This allows the angler to cover a huge area of 160-200m at once and still with enough definition to identify structure and fish. Once some structure worthy of a look has been identified, all the angler needs to do is simply tap the screen at that point which creates a waypoint. The angler should then motor over to that point and sit over the top of it whilst paying particular attention to the down scan screen.
Transducer Installation
Most people probably don’t give too much thought to this but proper installation and even placement of your transducer can have significant ramifications on the optimum functionality of your unit and even potential damage to the transducer if not installed correctly. People often invest considerable amounts of money on electronics only for a dodgy transducer install to let them down.
Taking the time to read and understand your unit’s user manual is a recommended first step but as a general rule of thumb, the transducer should be mounted on the starboard side of your boat as it is the area that provides the least amount of turbulence from prop wash. This can be verified by taking a look at the base of the transom whilst under power and making a mental note of where the clearer, less-turbulent water is. Fixing your transducer to this location will ensure accurate returns when travelling at speed which is great when travelling en-route to your chosen fishing destination as you can cover more water and identify potential new spots in the process. Just make sure that the location you do choose to mount your transducer doesn’t rub on your skids when the boat is on the trailer.
Ideally, you want to aim to have the leading edge of the transducer no more than one eighth of the way below the transom and parallel with the bottom of the boat. Even a slight down tilt is advisable. I’ve seen a lot of boats with the transducer incorrectly mounted just above the waterline. When this is done, there is cavitation leaving the back of the boat. This is when you get air bubbles over the face of the transducer and if this happens, then it won’t perform as well as it should.
Conclusion
Just because you have bought the latest and greatest sounder on the market, don’t think that it is a given that you will catch more fish without at least understanding the basic fundamental components of how your sounder works and the outputs it displays. Time on the water and patience whilst you are getting familiar with the unit is absolutely paramount BUT after you become proficient in the use of your unit, there is no going back. After all, you can’t un-learn something once you learn it so take in all you can.
Cheers,
Luke Galea.


